Game Hacking - Writing a Radar in Go | Version | N/A |
|---|
| Updated | |
|---|
| Author | Joshua Finley | License | DBE |
|---|
1. Introduction
As a cybersecurity professional, the world of game cheating has always been fascinating to me. The cheat-anti-cheat adversarial paradigm is essentially the same as that of malware and anti-malware. Yet, both sub areas of computer security have evolved uniquely, and amazingly, some of the most amazing work in computer security happens in the cheat-anti-cheat world. Evading an EDR and abusing a protected process to run code & extract credentials is essentially the same workflow as writing a successful cheat for a game protected by an anti-cheat, except the anti-cheat can often be more intense in achieving its protection goals than the best EDRs.
To write a good game cheat, a fair degree of reverse engineering and game engine knowledge is required. The tried-and-true method of constructing game cheats usually involves identifying key game objects in memory and traversing pointers to find, extract, and sometimes modify the game to the advantage of the cheater. This presents unique software engineering problems, as this methodology often requires the use of static offsets or byte signatures from the game process memory and the developer of the game, which are subject to frequent change.
2. Escape from Tarkov
Because of my interest in this area, I set out to write a demo of a specific class of game cheat for the game Escape from Tarkov, a first person survival looter-shooter game from Battlestate Games. The basic premise of the game is that the player assumes the role of an isolated private military contractor in a contested territory in eastern Europe. The player enters zones of this territory to find and recover valuable items for use or sale. Entering these zones typically involves interacting with other human players, and these interactions are almost always violent.
One interesting feature of this game is the level of combat difficulty. Not only is the player responsible for maintaining their energy and hydration levels, but the game also has a fairly advanced system for health of the player character’s body. Each limb’s health is tracked individually, in addition to overall player health. Damage to player health is represented by changes to the vision (blur, tunnel vision, etc), player mobility, and combat effectiveness. For example, damage to a leg will make the player limp, slowing them down. Damage to the arms makes shooting accurately extremely difficult. Additionally, there is no minimap and no indicators showing the locations of players. The level of danger and limited information available to the player make the game frightening, heart-racing, and engaging.
Escape from Tarkov (EFT) has enjoyed significant popularity, and probably as a result of this popularity and the difficulty of the game, significant cheating as well. To combat cheaters, Battlestate Games partnered with Battle Eye, an anti cheat provider, to deploy the game alongside Battle Eye’s anti cheat software solution, which operates in both usermode and kernel mode on the player’s machine.
Due to the intentional lack of a minimap and player locations in the game, a class of cheats called ‘radar’ cheats exists to add these features to the game. Any player who is able to monitor the locations of all other players has a significant advantage. Using player location information, the cheater can blindside and ambush other players or avoid them entirely, depending on the cheater’s goals for their session. Additionally, radars represent a form of ‘soft’ cheat, where the game is not modified, but only read by the cheat program, making it hard to determine whether a player is cheating using a radar based on their behavior in game and by monitoring the game process. Usually, these radar based cheats are constructed to use direct memory access (DMA) devices to perform DMA attacks against the game machine, and show player locations on a separate computer.
3. Examples of EFT Radars
There are several existing public and private source EFT radar projects. Most public/open source projects are not actively maintained and exist as hobby projects (as is mine). The private projects are usually paid services where a customer of the cheat receives a distribution of programs to interact with DMA devices they own to provide a game radar. These projects usually offer some degree of support, and differentiate from each other in the market based on level of support, cost, software quality, and features. Many of these providers market their services on game hacking forums and chat rooms, while some rely on word-of-mouth.
One example of a public EFT radar that served as an initial jumping off point for my adventures writing my own was https://github.com/danielignacak/RadarBase. This project is an outdated but generally useful example of a barebones EFT radar in C#. Other examples in mostly c++ can be found here:
4. Writing an EFT Radar
With ample examples on hand of some generic approaches to writing an EFT radar, I set out to write my own. In general, the approach to the radar algorithm is something like this:
- Obtain access to game memory using either DMA attacks, arbitrary driver memory read primitive, or windows API calls. Any method by which arbitrary game memory can be read can be built into a radar.
- Traverse game objects to find relevant data (player positions, player information, loot locations, etc)
- Stream relevent data to a plotting utility and display a live feed of information to the user
As a result of my efforts to implement such a program, I’m happy to share my project, radkov, an EFT radar base project written in Go. This project contains the source for accessing game memory, locating player data, and streaming it using gRPC. The remainder of this post will break down the components of this project and explain how it was written.
4.1. Project Layout
root
├───pkg
│   ├───rkpb                -> protocol buffer definition
│   ├───tarkov              -> tarkov game utilities (e.g. read player pos)
│   │   └───tarkov_test     -> READ THESE FIRST to understand tarkov package
│   ├───unity               -> unity game utilities
│   │   └───unity_test
│   └───winutil             -> utilities for reading process memory
│       └───winutil_test
├───radarsrv                -> radar web application backend
│   ├───cmd                 -> contains main.go e.g. `go run radarsrv/cmd/main.go`
│   └───radarapp            -> radar web application backend library
│       └───static          -> HTML, CSS
└───tkovmon                 -> main.go for tarkov game memory monitor
4.2. Why Golang
My favorite language for most sorts of systems programming is Go. It’s as expressive as Python but with strong typing and none of the object-oriented nastiness. Go is decently mature at this point in time as well, and in my opinion is a great language for both serious code bases and hobby projects alike.
4.3. Reading Game Memory
Wrapping up the Windows API
As mentioned earlier in this post, most EFT radars leverage DMA devices to read process memory. These are deployed to give the cheater the advantage of stealthy memory access. These devices attach to the game machine’s PCI bus and issue read commands to physical memory without touching the CPU, making them difficult (but not impossible) to detect.
But this method is used in real cheats. My objective was not to write something for actual game abuse, but a toy project that does everything else that the cheat does. Because evading anti-cheat was not a requirement, I instead leveraged plain-old Windows APIs to read game memory. To make this convenient, I began by writing a simple WinAPI wrapper project. This package abstracts finding processes and loaded modules, obtaining handles, and reading memory. This makes reading game memory from the cheat backend simple and abstract:
type WinProc struct {
	Pid     uint32         // process id
	Modules []WinMod       // loaded dlls
	Handle  windows.Handle // handle to process
}

func (p *WinProc) Read(addr uintptr, size uint32) ([]byte, error) {
	buf := make([]byte, size)
	var read uintptr = 0
	err := windows.ReadProcessMemory(
		p.Handle,
		addr,
		&buf[0],
		uintptr(size),
		&read)
	if err != nil {
		return nil, err
	}

	return buf, err
}

// Read 64 bits (8 byte) at addr
func (p *WinProc) ReadPtr64(addr uintptr) (uintptr, error) {
	buf := make([]byte, 8)
	var read uintptr = 0
	err := windows.ReadProcessMemory(
		p.Handle,
		addr,
		&buf[0],
		uintptr(8),
		&read)
	if err != nil {
		return 0, err
	}
	ptr := uintptr(binary.LittleEndian.Uint64(buf))
	if ptr == 0 {
		return 0, fmt.Errorf("failed to read memory at 0x%x", addr)
	}
	return ptr, err
}
4.4. Finding Player Positions
The next challenge - and the meat of the project - is in locating the data we need for the radar, namely vectors (x,y,z coordinates) representing player positions on the map. To assist with this, I wrote a simple package called unity to abstract basic components of a Unity game and offer utilities for Unity specific game components.
To be completely honest, I’m not certain how much of the code for my unity package is actually tarkov specific, but the abstraction of these basic Unity related components of the cheat was still useful. The general approach is to find the game and its UnityPlayer.dll in order to find the generic Unity game objects relevant to the cheat, namely GameObjectManager and LocalGameWorld. From my little experience, these components seem to be common to all unity games and are extended by game developers to implement game functionality.
The unity package of my radar backend accepts offsets as paremeters and will attempt to traverse these game objects:
type UnityGame struct {
	Proc              *winutil.WinProc // process associated with the game
	Mod               *winutil.WinMod  // dll associated with the game
	GameObjectManager uintptr          // GameObjectManager address
	LocalGameWorld    uintptr          // Local game world
	Offsets           Offsets
}

func NewUnityGame(process string, offsets Offsets) (*UnityGame, error) {
	err := ValidateOffsetStruct(offsets)
	if err != nil {
		return nil, err
	}

	proc, err := winutil.NewWinProc(process)
	if err != nil {
		return nil, err
	}

	gameMod := winutil.FindModule("UnityPlayer.dll", &proc.Modules)
	if gameMod == nil {
		return nil, errors.New("could not locate UnityPlayer.dll")
	}

	ug := &UnityGame{
		Proc:              proc,
		Mod:               gameMod,
		GameObjectManager: 0,
		LocalGameWorld:    0,
		Offsets:           offsets,
	}

	gom, err := ug.FindGameObjMgr(offsets.GameObjMgr)
	if err != nil {
		return nil, err
	}
	ug.GameObjectManager = gom

	lgw, err := ug.FindLocalGameWorld()
	if err != nil {
		ug.LocalGameWorld = 0
		return ug, err
	}
	ug.LocalGameWorld = lgw
	return ug, nil
}
This is where the process of engineering game cheats gets tricky. Offsets are essential to this approach to writing the cheat, and the offsets can change between releases of the game, requiring some amount of manual or automatic reverse engineering to update offsets. In my mind, it makes the most sense avoid hard-coding these offsets into the source and instead abstract things a bit to provide up-to-date offset information. This has the benefit of keeping the code modular and the access of memory at each offset easy to follow while reading the code.
The unity package also implements the fundamental data type that we are attempting to stream from the game process – the vector.
type Vec3 struct {
	X float32
	Y float32
	Z float32
}
In addition to providing this data type, the unity package provides utilities to convert raw game memory to and from this Go structure.
With the ability to access relevant game objects, the only remaining challenge in finding player positions is to do so using the game objects. The entire process looks like this:
- Find the game process
- Locate the
UnityPlayer.dll module in memory - Find the
GameObjectManager object within the UnityPlayer module - Traverse objects associated with the
GameObjectManager to find the LocalGameWorld object - Find
PlayerList object from LocalGameWorld. This object contains a list of pointers to all PlayerObjects. - Traverse
PlayerList and extract player positions (vec3) from each player object - Stream this data to the radar client
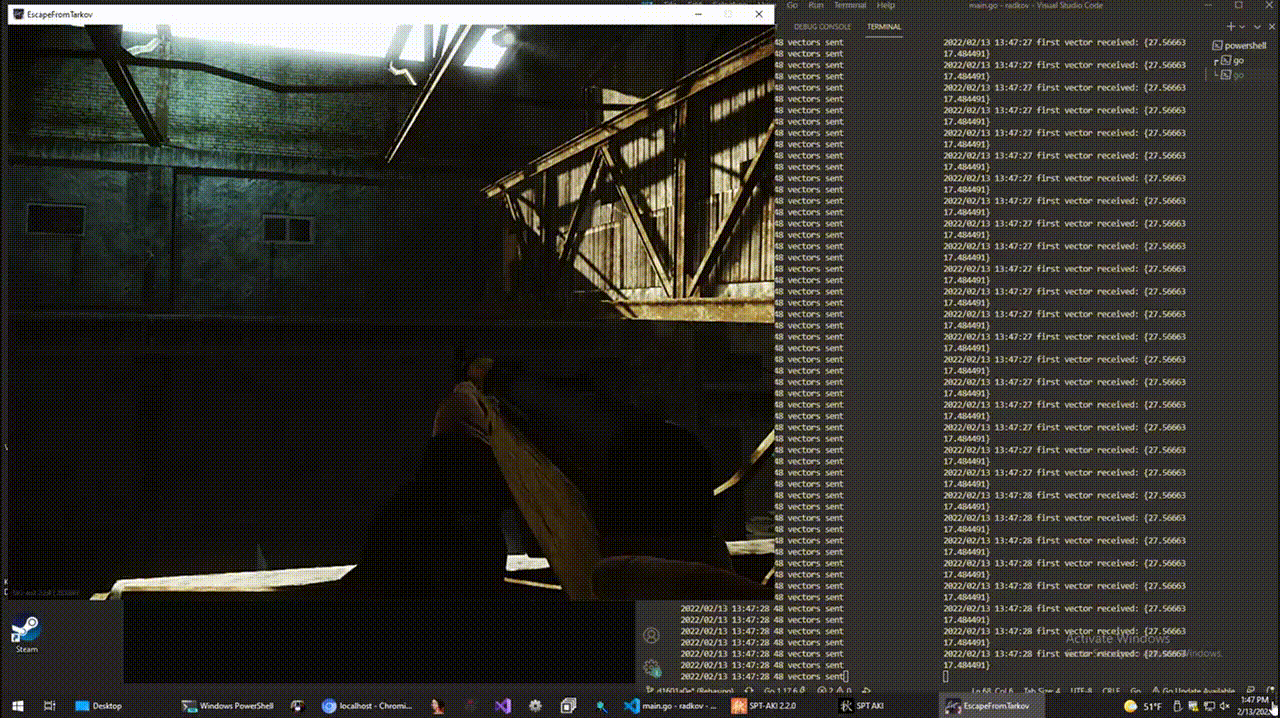
The code for steps 5-7 are implemented in radkov/pkg/tarkov and radkov/tkovmon, with tkovmon being the main game monitoring package. tkovmon builds upon the tarkov, unity, and winutil packages to monitor player positions in game memory and stream them using gRPC. gRPC allows us to specify a protocol buffer format for the radar and RPC server prototypes for sending and receiving data about player positions:
// Radkov Service
service Radar {
    rpc StreamPlayerPositions(stream PlayerPositions) returns (stream Response) {}
    rpc PlayerPositionsStream(Request) returns (stream Response);
}

// Represents a generic server request
message Request {
    int32 code = 1; // which service to get? see svcno.go
}

// Represents a generic server response
message Response {
    bool ok = 1;
}

// Represents multiple player x & y coordinates
message PlayerPositions {
    repeated bytes rawVectors = 1;
}
tkovmon leverages these types and server prototypes to call functions from the other packages to monitor game memory and stream positions:
func main() {
	// dial server
	conn, err := grpc.Dial(
		":1337", grpc.WithTransportCredentials(
			insecure.NewCredentials()))
	CheckFatal(err)

	// create stream and its chan
	client := rkpb.NewRadarClient(conn)
	stream, err := client.StreamPlayerPositions(context.Background())
	CheckFatal(err)

	pch := make(chan [][]byte)
	go tarkov.MonitorGame(pch, &tarkov.TarkovOffsets)

	// send
	for d := range pch {
		post := rkpb.PlayerPositions{
			RawVectors: d,
		}

		if err := stream.Send(&post); err != nil {
			log.Fatalf("failed sending: %v", err)
		}

		log.Printf("%d vectors sent", len(post.RawVectors))
	}
}
From there, its just a matter of plotting player positions visually, which is a task I find uninteresting, hence why I have not completed it and don’t intend to :)
5. Conclusion
Please remember that this project is not intended to provide a working game cheat or instruct any one on abusing other players and ruining their game experience. Please don’t try to use radkov to cheat in live games with real players for these reasons. radkov is not written to be stealthy and evade BattleEye, or leverage DMA attacks to cheat in real games.
With this project, I completed my first true game cheat, leveraging public knowledge to create a completely new radar cheat framework for Escape from Tarkov. Most public examples are hard to read and rely on hard-coded offsets, but I aimed to avoid these mistakes and provide a clean demonstration of a radar type cheat for a Unity game in a language seldom used in the game hacking scene. This was a super engaging and exciting project, and I hope this article and the radkov project source code have been of instructive value to the reader.